Monday 25 July 2011

Growth Compositing

Over the last few weeks, I have been trying to finish compositing "Growth".

As mentioned in a previous post, I have been working in Nuke to put all of the render layers together and adjust all of the visual attributes. Growth uses a variety of passes (rendered out of Maya), and these are shown below;

growth_f350_bgLayer

growth_f350_baseLayer

growth_f350_xrayLayer

growth_f350_glowLayer

growth_f350_matteLayer

growth_f350_dustMatteLayer

growth_f350_depthLayer

I was initially having problems adding depth-of-field (my frames were acquiring 'stepped' edges) in Nuke, but as part of our masterclass with Hugo Guerra, I was able to get Hugo's help in fixing this (well, it couldn't be fixed, but we found a way to work around the problem!).

Beyond this, I was able to get some great feedback from two of my classmates, on how to improve the final output of my work.

Mark Haldane suggested that I 'grade' the cells, as they could do with a bit more contrast/definition.

Matt Cameron suggested that I should try adding motion blur and chromatic aberration.

At this stage, I had already created Nuke scripts for each of the shots, which would combine all of the render passes, add a background and calculate the depth-of-field.

I then created a second Nuke script, which would take this first rendered sequence and add the chromatic aberration, motion blur, and film grain.

growth_nukeScript

The image below shows one composited frame, after it's been through all of the stages outlined above;

growth_f350_comp

Compositing has definitely transformed the outcome of my project. Although my main abilities are in 3D, I also realise the importance of compositing and how being able to use these additional skills can improve the presentation of my 3D work.

In the case of "Growth", the advice I have received has definitely been good, and is helping me to take my 3D work to the next level!

Wednesday 20 July 2011

Growth In Stereoscopic?

Growth in stereoscopic? Wouldn't that be interesting...

After creating simple stereoscopic/anaglyph sequences previously (here and here), I decided that the dynamic flowing camera moves that I created for Growth would really take advantage of stereoscopic 3D. These shots are designed to view the cell growth and development from unusual close-up angles, and are animated to 'fly' close to the cell surface.

After speaking to my classmate Mark Haldane (who has previously created anaglyph material) and getting some feedback on previous stereoscopic efforts, I decided I wanted to test how it could look, so started work on setting up a still image.

I tried to enhance the amount of depth created by the stereoscopic camera setup, as there was not enough previously. Because some of my shots had cells moving off the edges of the frame, I wasn't sure how well they would work, but Mark suggested a way I could work around this problem.

Below are two images; the first showing the anaglyph effect applied to the original cell style I was using, and the second showing the effect applied to the new cell style (as a comparison).

growth_anaglyph_before

growth_anaglyph_after

With the Masters show opening just over a month away, I have started thinking about what content will form part of my show. Stereoscopic material is something I would really like to exhibit, but this comes secondary to completing Growth and it's 'Making Of' film.

Dependant on my time, I will continue to experiment with anaglyph renders, and hopefully have something worth showing!

Sunday 17 July 2011

Growth Visuals

Now that the timing and content is close enough to being finalised, I have spent some more time polishing the visual style of the cells.

Feedback has shown that the visuals are a bit 'murky' at the moment, and there needs to be more definition - something to make the cells 'pop' and stand out. The cells move in a really unique and interesting manner, so it is important that this is the focus of the viewer (so that all my hard work can be seen!).

My project supervisor suggested I take a look at a DVD in the library by Jeremy Vickery, titled "Practical Light and Colour" (more information here). This DVD discusses the fundamentals of light and colour, and how a better understanding can improve practical work. If anything, it serves as a fresh source of ideas and inspiration, which will hopefully develop my cell aesthetics and drive towards the best outcome possible.

After watching this DVD, I started experimenting with colours and light in Maya, trying to develop something which was much more interesting, less murky, and had more focus on what I wanted the viewer to see.

Below are two renders; the first showing a still from Growth before this DVD/experimentation, and the second showing a new version, which uses entirely new lighting, colours and Maya shaders to give a different style completely.

growth_visuals_before

growth_visuals_after

I have yet to test this new style on an animated sequence, but I definately prefer the clarity that this updated version offers. The cells have significantly more contrast (against the background) and are less flat - by adding an edge glow, they really draw the viewer's attention.

Thursday 14 July 2011

Growth Progress Update

Since my previous post, I have continued working almost exclusively on 'Growth'.

All of the cell visualisation stages in Maya are completed (e.g. scripting, dynamics and render setup), and all the camera work has been (pretty much) finalised. Most of the rendering has now taken place, and I have spent a large amount of my time compositing the different shots and passes, using After Effects.

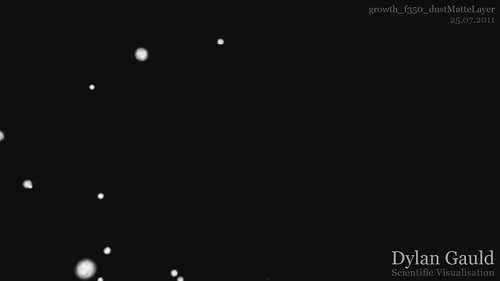
This uncovered several problems in the 3D work, such as dust particles floating in front of the camera, or 'through' the cells (which looks like they are being absorbed). These issues have taken longer to fix than expected, as it has meant rotoscoping out certain areas of some image sequences (primarily the depth passes). Although this is a time-consuming fix method, it is certainly much faster than recreating the particles and their movement in Maya, and then re-rendering several layers to be composited again.

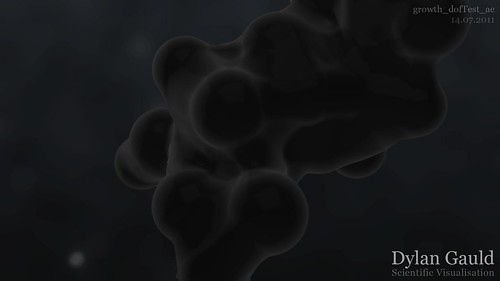
One of the main issues I am currently experiencing is the use of depth of field in my shots. I want a really shallow depth of field, giving the correct impression of (macro) scale. After Effects has a feature called Lens Blur, which allows me to composite using Maya's depth pass. Unfortunately, this feature is quite limited in terms of the amount of effect that can be applied, and isn't enough for what I am trying to achieve.

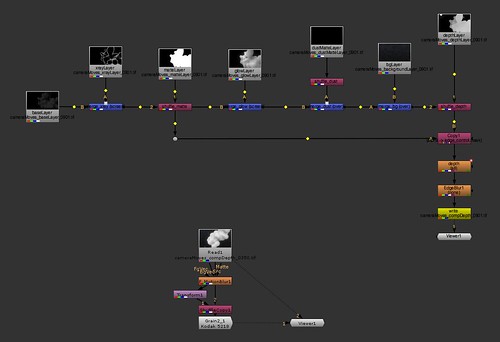
Because of this, I have started setting up one of the shots in Nuke. I tested this by using After Effects to render out a composited sequence, and applied the depth using a ZBlur node in Nuke. I was much happier with results that Nuke gave (and the use of the 'focal-plane setup' feature) so I have decided to rebuild the shots properly, using only Nuke.

Since most of the composition is blocked out and timed in After Effects, I will render each shot entirely out of Nuke, and take the completed shot sequences back into After Effects (which is the most straight forward way of working for me). The previous alternative would have been to create the shots in After Effects, render out composites for Nuke, apply the depth and tweak the shots, then bring them back into After Effects - a much more complicated process. I still want to complete the final project in After Effects, as I am much more comfortable laying this out on a timeline (which is already done anyway).

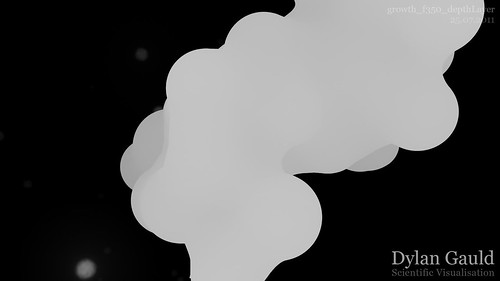
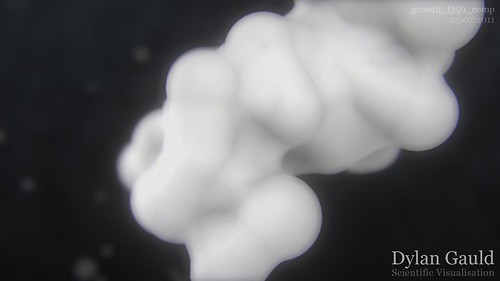
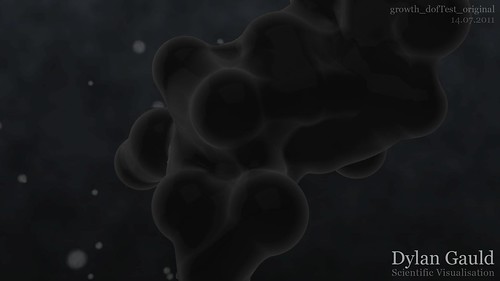
As part of my testing, I have generated 3 versions of the same frame to show the visual differences. The first is the original composited shot, rendered out of After Effects. The second image shows the outcome of using After Effect's Lens blur to add depth of the field. The third image shows the outcome when using the ZBlur node in Nuke.

growth_dofTest_original

growth_dofTest_ae

growth_dofTest_nuke

One thing that became apparent using Nuke, is that not only did it allow me to apply depth of field in the way I wanted, it created less banding in the rendered TIFF files. Banding is something I have struggled with so far (because of the subtle variances in colour), so this is another advantage of using Nuke!

Moving forwards, I plan to continue compositing the shots initially in Nuke, and then bring everything together in After Effects. This should be the best way of achieving the look I want, and avoiding the banding that was present in After Effects.

The next step beyond this, is starting work on a 'making of' video (for the degree show), which will contextualise the content of Growth, and provide more information on the methods used during it's creation.

Tuesday 5 July 2011

Growth

Over the last two weeks, I have been developing the concept for the final outcome of my Masters project. This will take the form of a short video (approximately 3-4 minutes in length) and is intended to showcase some of the cell visualisation work I have completed. In addition to this, I plan on creating a second video which will be a technical showcase of my skills and abilities and also contextualise the work I have completed.

Although I don't want to give away too much, the main piece will be split into two halves, titled Growth. My title concept can be seen below;

growth_titles

As a sneak preview, the video below shows one of the shots I am currently working on in After Effects. Using the VERL render farm, I have already generated most of the content I plan on using (in 1920x1080 lossless TIFF format) which gives me a great deal of flexibility. The original shot did not feature any depth of field and looked flat and uninteresting, whereas this updated version has much more style and visual interest;


So far, I haven't decided if I will include the dust motes/particles idea which I previously worked on. Although I have considered this option, I don't have any sequence renders which I can use, so I took a still frame and applied the effect, as a test. This frame test can be seen below;

growth_04_cameraMoves_1000

Moving forwards, I will continue developing the look and feel of these shots. I am also currently looking at using music to add impact to these shots, but this is an ongoing project and I plan on trying to finish work on the visuals first, so that I can get a good 'feel' for the experience I want to create.

Sunday 3 July 2011

Stereoscopic Update

Following on from my early tests of creating stereoscopic content out of Maya (here), I have completed rendering and compositing of my full cell visualisation sequence.


The process of working with a sequence instead of a single frame was not hugely different, and I feel confident that I could apply an anaglyph effect to a scene in the future. Currently, as it is anaglyph, I have been working in grayscale, but moving into colour is something I would like to achieve.

I am planning on meeting with my project supervisor and programme leader, to discuss the possibility of showing stereoscopic material during the Masters show in August. I am not sure if this will be a viable solution,  but it is worth looking into...

Friday 1 July 2011

Falling Out

Matt Cameron, one of my classmates, is currently directing a short film titled "Falling Out" (production diary here). The logline for Falling Out is below;
A pregnant woman struggles to find direction after a nuclear blast decimates Scotland. Locked in a bunker with a jaded survivalist and her dying boyfriend she faces tough choices in this brutally changed world.
I will be assisting Matt in creating some of the visual effects which will be added to this film - in particular, using 3D computer graphics and animation to create a dynamically-driven nuclear explosion which can be composited onto a live plate at the beginning of the film.

So far, I have recreated the camera setup in my 3D environment (so the CG cameras match the real-world cameras), and completed some early explosion tests. Over the next few weeks, I hope to tighten up the explosion (which is not nearly nuclear enough) and generate some nice high-definition renders which will be suitable for the opening shot of Falling Out...