Tuesday 22 February 2011

Going To The Cinema

This morning, I stumbled across a fantastic website, called Molecular Movies. It describes itself as a 'portal to cell and molecular animation' and aims to provide scientists with tutorials on developing 3D visualisation skills.

Alongside tutorials, the website has a showcase section, with examples of 3D being used to visualise complex biological scenes - although these are interesting to watch, the scientific content is a bit beyond my own knowledge. Fortunately (and more importantly), it is useful to have a 'database' of the kind of work that is going on in my field.

Returning to the learning resources, I realised I had already covered the majority of content, as it was designed for those new to using 3D. That is, until I found an interesting article on using metaballs to create molecular surfaces, using Cinema 4D. Although I was not familiar with using C4D, I decided it was worth looking at it, as it was going to less technically challenging than learning Houdini (which is also reliant on Python), and should give a similar result.

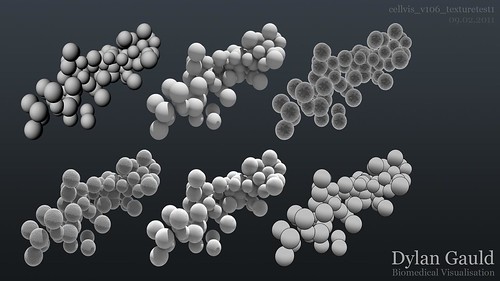
Creating metaballs in C4D was fairly straight forward, and gave great results with very little input. It took a bit of time to figure out how to animate objects, and then render a scene, but after using the software, I would definately be confident using it again. The geometry was also significantly 'cheaper' than my testing in RealFlow, and could be used on a large scale. A video example of metaballs in action can be seen below;


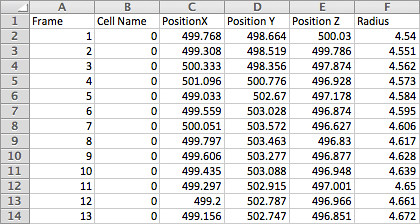
The next step was to take my cell data-set and use metaballs to create a single organic structure - this proved substantially more difficult. Realising that I couldn't simply 'read' my data, as C4D also relies on Python, I opted to export both OBJ and FBX files from Maya, hoping that at least one would work.

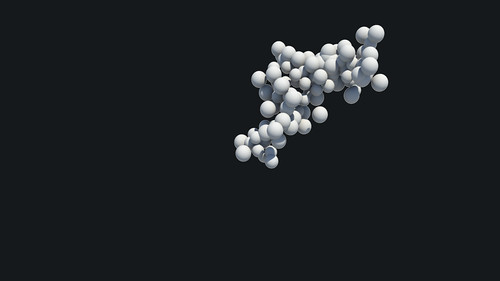
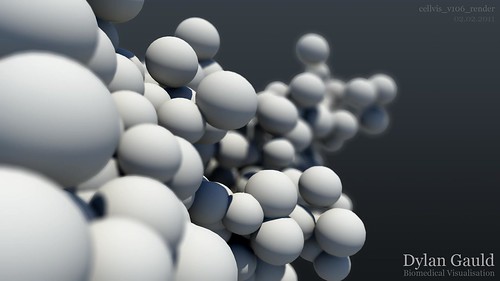
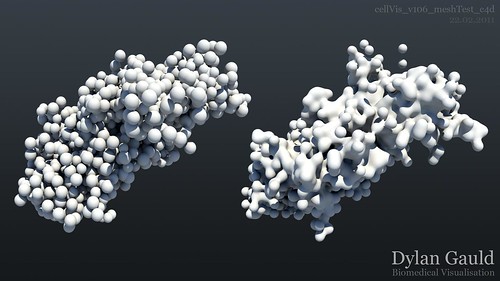
These imported easily, and a metaball surface could be applied, but did not work properly (simply creating one large sphere). After vast amounts of experimentation, I scaled the imported objects... and success! A simple fix for what seemed like a complicated problem. This breakthrough meant that I could now take objects into Cinema 4D, use metaballs to create a surface, and either render, or export to Maya for render (as I am more familiar with the software package).

The only difficulty now, is that this workflow currently only works on single frames, and can't be applied to my animated data-set... this is the next problem to solve! A render of the results so far can be seen below (showing a before/after comparison);

cellVis_v106_meshTest_c4d

After my previous post, I felt like I had reached a brick wall, but after discovering the Molecular Movies website, it has helped me hurdle these difficulties... only to find a new hurdle waiting on the other side!

Monday 21 February 2011

Reaching Limits...

This week has proven difficult in terms of my ideas being restricted in their implementation, primarily by the software/technology I have available.

Scripting has made a reasonable amount of progress. I have added colour changes to my first data-set, as it was not clear when cells 'appeared'. New cells begin red, and fade to their regular colour over 25 frames (1 second), which is more informative, and better communicates the data visually. It is important to point out here, that this change was added to the MEL version of my script. A render taken from the Maya scene can be seen below;

cellVis_v106_colourTest

I started developing skills in scripting using Python, as Houdini relies on this for data input. Python also crosses over with Maya as the shared 'language'. I began by trying to find the common links between MEL and Python, which accelerated my understanding of how to code effectively in Python and make things happen. The Maya-Python version of the script is now equivalent to the MEL script.

However, the Houdini-Python script currently only reads data, but does not yet generate or animate geometry - I am having difficulties finding useful information on the Houdini specific Python module (commands), so this part of scripting is on hold for now.

Due to these difficulties, I returned to Maya, and started work on trying to create an organic-looking cell surface - that is, a single surface which is created from all of the cells, and moves and acts as one (instead of 1067 individual cell 'spheres'). Initially, I wanted to generate a particle field in place of spheres, but, unfortunately, Maya does not allow transformation of individual particles within a particle object. There is no way around this, except by creating a separate particle object per cell - by doing this however, the particles can no longer merge together as one.

I started to consider other options to achieve this organic look, with RealFlow being top of my list. I generated a 'particle sphere' in Maya and exported this directy into RealFlow. After developing a complicated workflow of imports and exports, and a lot of experimentation, I was able to then use RealFlow to mesh this particle field. However, for one cell to be meshed fully, I required around 37,000 particles, generating approximately 110,000 faces for the mesh. With a scene containing 1067 cells, I realised that although giving a nice result, it was certainly not a viable option. A render of the style of cell-split can be seen below;


Beyond using RealFlow, my next efforts will involve using particles or metaballs in Houdini. Metaballs work very nicely (tested using 2-3 objects manually), and are 'clever' spheres which merge together when they are close to each other (without any configuration in Houdini, metaballs give a great looking result). Particles in Houdini will hopefully offer more flexibility than Maya, allowing me another technique to create the look that I want to achieve.

Although I have found this week frustrating, finding limitations in the software I am using, I am confident that I will be able to find a solution, allowing me to realise the full potential of the creative ideas I want to unleash...

Monday 14 February 2011

Visual Experimentation

After figuring out MEL scripting, and using it to create an entire Maya scene for me, I chose to begin experimenting with compositing further.

This involved setting up render layers in Maya and testing how they work - creating different layers for specular highlights, shadows, depth passes, etc. After a bit of tweaking, I am confident that I will use this moving forwards.

These render layers were then taken directly into Nuke as image sequences, where I praticed reading and writing files, merging nodes, and also colour correction and grading - all of which will be relevant to my own work, and a crucial stage in presenting work to a professional level.

Simulating depth of field formed an important part of my testing, as this would be used alongside my cell visualisation work - giving the impression of viewing tiny microscopic objects. A short render of a composited file in Nuke can be seen below;


After ensuring I could work with render layers and depth of field, I started to look at possible textures to use with some of my cell visualisation work. Examples of these can be seen in the image below;

cellvis_v106_texturetest1

Although there is still a lot of work to do, my visual style is developing, and I am hoping to continue this experimentation, with a focus on adding colour. More importantly however, is how I use these attributes to present my work to a specific audience - this is something I will have to discuss with the mathematicians, as I will need to define their audience before I can design for it.

In addition to continuing my cell visualisation work, I have carried on developing my skills in using RealFlow. Below is an example of the type of work I have been undertaking;


I am still planning on learning how to use Houdini - primarily because my scripting has come to a halt in Maya. Within Maya, individual particles (as part of a particle field) cannot be manipulated as they have no Transform node. This means that I cannot use my MEL script to automatically generate and keyframe a particle field. Although I do not know much about Houdini, it seems more technically advanced, and I hope that it will help me take my script to the next level.

Wednesday 2 February 2011

Biomedical Visualisation

With a new year, comes new ideas and refreshed inspiration!

Over the last couple of weeks, I have been developing my MEL scripting abilities - something necessary if I want to work with importing numerical data into Maya. Although daunting at first, things have gradually started to make sense, showing the logical development of the stages involved in trying to achieve my goal.

Last week, I had a major breakthrough in using MEL, and was able to create a script which would read one of the mathematical data-sets. The script works on a line-by-line basis, reading comma separated values and placing those into individual variables, which are then used to create objects and keyframe animation. Upon running the script, all actions are automated, and require no input from the user - this simplifies the process, and speeds up creation of a Maya scene greatly. It also ensures that no mistakes are made, as long as the script is correct and data is formatted consistently.

An example of the type of data being used can be seen below;

ExampleData

The purpose of this script is to convert raw numerical data into something visual, built in 3 dimensions. Currently, the script uses simple polygonal spheres to represent cells, although in the future this could be changed to use particles, or something different entirely. An example render of the scripts process can be seen below - the results are dramatically different to looking at thousands of line of numbers;

ExampleRender

At this stage, I was confident in my MEL writing abilities, so created 2 more (similar) scripts which would work with the other mathematician's dataset. This data is entirely different however, as the cells are placed in 2 dimensions, and instead of changing size/radius, they change colour based on a numerical value. This posed it's own problems, as I would need to have a new shader for every cell, if I wanted them to change colour individually. The scripts for this data work, but are still in early stages - no renders have been produced as of yet.

Beyond being able to get data into Maya, I was then free to experiment with the visual aspects of representing the data. I tested several techniques which would be useful later on, including using render layers (for alpha channels and depth passes), adjusting camera settings in Maya (to create depth of field) and compositing render layers using both Nuke and After Effects (using short image sequences). Although familiar with compositing techniques in Photoshop, I wanted to familiarise myself with these methods when working with videos and image sequences.

As the final part of my experimentation, I started working with the first data-set in 3D, and added a camera and some basic lighting. I rendered 3 passes - 'beauty', alpha and depth - and composited each of these layers using Photoshop. After some experimentation, I realised that I was happy with the result, and would be confident in replicating the visual style using finished image sequences. The completed composite can be seen below;

cellRender

Although I am only 2 weeks into this semester, I have made tremendous breakthroughs in my own programme of study, particularly with using MEL to import numerical data. I hope to continue this progress throughout the semester!

Moving forwards, I would also like to continue developing my technical skills and abilities - this will ensure that I have the best opportunities to create high quality work, with no restrictions on the software I can use to achieve this. I hope to continue working with RealFlow, and hope to have some visual examples soon. I also plan on developing skills in using Houdini, another 3D package, with a more technical focus.